Drumming · Technique · Rudiments · Gear · Lessons & Learning
5 Drumming Technique Tips
5 tips for building up the weaker hand — week 06
Tip 1 — Tip for traditional grip users
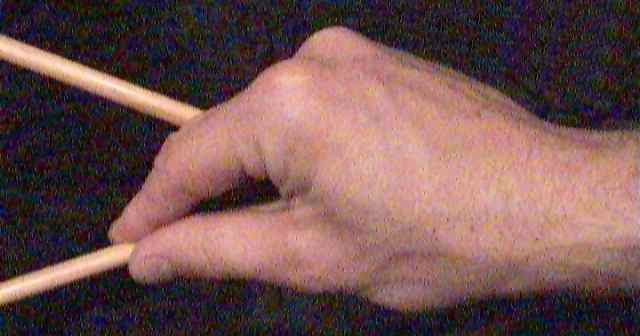
This one’s great if you are a percussionist who happens to play marimba or vibraphone as well. These days it’s standard practice for keyboard percussionists to use four mallets — two in each hand. There are a few different grips for doing this, but by far the most common one is the “Burton” grip named after vibraphonist Gary Burton. I have included a single picture of this grip here, but for those who are unfamiliar with it, you might want to check it out in more detail at percussionclinic.com/lessons/01malletlesson.htm.
Even if you have no desire to play marimba or vibraphone it’s a cool thing to be able to do, because you can use it with a pair of normal drumsticks in one hand as well — as long as they are not too thick. The best exercise for us to practise is what we call an “independent roll” — essentially a single stroke roll between the two sticks in one hand. To play with the stick held between index finger and thumb, you use a twisting rotation of the forearm just as you would for traditional grip. To play with the other stick you use an up/down bending of the wrist just like you would do for matched grip. Swapping continually between these actions is great for learning to keep the hand relaxed and the movements precise. It’s also fantastic for helping your backsticking along, because backsticking also swaps between the two different types of motion. Check out the next video blog here for more info on backsticking.
Tip 2 — Tip not involving drumming
One of those little tasks which requires much more coordination than you might imagine is using scissors — especially if you have to use them in a carefully controlled way. This week, I want you to do the following task once every day. Take a normal sheet of paper and draw about 5–7 basic shapes on it, big enough that together they basically fill the page. Squares, circles, triangles and even irregular squiggly ones. Then use a pair of scissors in your weaker hand to cut the shapes from the paper, following the lines as closely as you can.
Tip 3 — Tip for evenness and matching the hands
Here’s a great idea! If you’re anything like me, you can achieve a fairly even double stroke roll when you are just letting the sticks bounce passively — you just have to concentrate on letting the sticks and gravity do the work. The problem and unevenness starts to happen when you need to play louder and really use the fingers to MUSCLE the notes out — what we call ACTIVE finger control. The fingers of the weaker hand are simply not as strong and coordinated so its double stroke tends to be weaker and fade more.
The exercise to help you with this is to overcompensate by working the weak hand even harder. It’s the old trick of using two different playing surfaces. Use a normal practise pad or drum for the strong hand, and an old book or even a cushion for the weak hand — something with a little more give in it. This will really force you to work the fingers of the left hand to get the double strokes at all. You can even practise whole pieces of music like this. I used to work on certain snare drum solos in this fashion.
Tip 4 — Playing more notes with the weak hand, or leading with the weak hand
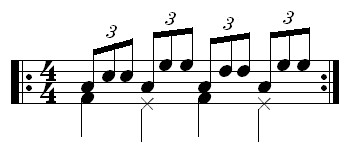
Here is a nice little ostinato groove to play on drum kit which works your left hand more than your right — in fact exactly twice as much. As usual, swap it around if you are a leftie. Here the strong (right) hand stays on the floor tom and plays the note on the beat. The left hand plays the double strokes on the other drums. Not only does this mean the left hand is playing two for every one the right hand is playing, but the left arm has more work to do as well, as it is continually moving between different drums. Once you get the idea try using different patterns of drums with the left hand — keep using the RLL pattern and keep the right hand on the floor tom, but vary the left hand movement.
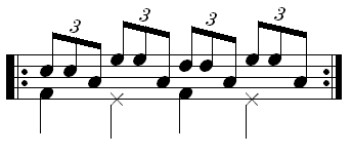
In this variation shown below, we are essentially doing the same exercise but making it one step harder again for the left hand, by using it to lead. Once again you can vary the pattern of drums it moves to if you like, to keep it more interesting. The alternating bass drum – pedal hat pattern shown in both these grooves is not essential. I just chucked it in there for the feet to do something. You could start with just the hands to make it easier, or you could use two bass drums or more complex foot patterns — whatever!
Tip 5 — General weak-hand skill exercise
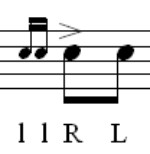
The following is a great little rudimental exercise to get the weak hand working in different ways. As usual it’s shown here for the left hand, so left handers should reverse the sticking. The skill you really need to work on here is the transition from wrist powered note to the finger controlled double of the drag. Once again — it’s not either part by itself that often causes our weak hand an issue, but the greater coordination required to make the transition between using different parts of the hand to control the motion.
Just try it continuously, and you will see what I mean. Don’t cheat and put a gap after each repetition of the pattern — make sure you strictly count 1 & 2 & etc as you play it. Remember the grace notes of the drag do NOT count as part of the rhythm, you just have to squeeze them in there before the beat.
As usual — the blatant self promotion: check out the “Stick Technique” book at www.sticktechnique.com for heaps more info on drumming technique.