Drumming · Technique · Rudiments · Gear · Lessons & Learning
5 Drumming Technique Tips
5 tips for building up the weaker hand — week 05
Tip 1 — Tip for traditional grip users
In the past I was a regular user of traditional grip. I did eventually make a permanent change to matched grip over a decade ago and have never looked back, but as a rudimental technique specialist, I still need to use it regularly. It’s no longer my main grip, but these days in my opinion, top line rudimentalists need to be at least competent with both grips, and if you are serious — with both hands.
In many ways I admire the philosophy of many Swiss drum corps in that rather than take the approach that this or that way is the way to play, they have the open minded and forward thinking approach — “why not be great at both?” If for no other reason, a rudimentalist should learn a little of both grips with each hand because you will always have to do backsticking. Backsticking is a fairly integral part of most rudimental drumming these days, even before you get to the higher levels. Backsticking is essentially flipping the stick over and playing with the other end WITH THE OPPOSITE GRIP!
Now that I’m done with my ranting — here’s the tip…
When playing strongly with the traditional grip — particularly when using it for backsticking — I often find that there is great stress placed on the tip of the index finger. To really control a loud note with traditional grip, it is vital that the tip of the index finger is over the top of the stick to take the strain off the fulcrum. Usually the idea is to use the very tip of the finger and contact is made with its side edge. This is great for softer playing, but for louder playing (when you really need it) it can be less than fantastic for that little joint.
My solution in recent years has been to try to get the index finger a little further over the stick for these accented notes. The idea is to try to contact the stick with the second segment of the finger past the first joint. This moves the strain to the next and stronger joint and puts less pressure on it anyway, as there is less leverage further down the finger.
Tip 2 — Tip not involving drumming
Here’s this week’s tip. Find an old tennis ball or buy a cheap one. For three or four minutes each day we are going to practise bouncing it with the weaker hand. You can do this on a flat piece of ground or on a table top. The idea is that the bounces should be very low and quick — we are not using the arm at all — this is a wrist and fingers exercise, so the motion is purely from the wrist and fingers. Try to get the bounce height so that the fingers don’t — or barely — leave the ball. You can work to speed the bouncing up through the week. This exercise is great for practicing that “stick feedback” which is so important for efficiently using natural rebound.
Tip 3 — Tip for evenness and matching the hands
This week’s tip for matching the hands is a bit of a technical one, and it’s mostly of use for those working on their singles and doubles etc who have a slight discrepancy in sound and/or volume between the two hands. For this you will need the ability to record yourself and a metronome. The recording doesn’t have to be fantastic — even a crusty old tape recorder or dictaphone type device will do — but it does actually help if the quality is ok. The reason for this is that we are going to try and fool the brain with reverse aural feedback. You can use this approach for many rudiments or patterns, but the simpler ones are a good place to start, and I’m going to describe single strokes here.
The first step is to record your working track. To do this we need to find an appropriate tempo. Play your single strokes with the metronome, leading with the weak hand. Experiment a little till you find a tempo which is challenging but under good control. Now minus about 20 bpm from that, and this will be your working tempo. With the metronome set, record about two minutes of yourself playing single strokes on a practise pad with the metronome in this manner. You can also create another recording, only this time leading with your STRONG hand.
You should endeavor to keep the sound as even as possible while recording. If your hands are already perfectly even then you probably don’t need to do this exercise ;-) but having a listen back to your recordings will tell you how even you really are! Make sure that both the sound of the metronome and your playing is easily audible in the recording. Now you have your work tracks, and it’s time to do the actual exercise.
Play your recording back. It is preferable to use speakers not headphones, and on a decent quality sound system. The idea is that we want the sound being played back to be as close as possible to the original sound. You will need to adjust the volume so that it matches the sound you are getting “live” from the practise pad — or even just a little bit louder. If you really want to be perfect with this you could actually use headphones and use a mixer to mix in the “live” sound from your pad with the recorded one — obviously using the same mic setup as you did when recording. For most of us this is a bit tricky to set up, so just using a home hi-fi is ok.
Now… while playing back the recording you need to play along with it, making sure that you are leading with the same hand as you were on the recording — remember we will do this twice, leading with one hand, then with the other recording leading with the other hand. As you play listen to the overall sound and try to make it as even as possible. The idea here is that whatever unevenness is present in the recording becomes even more evident as you play with it, and as you start to really hear the difference you hopefully will start to compensate when playing along.
Tip 4 — Playing more notes with the weak hand, or leading with the weak hand
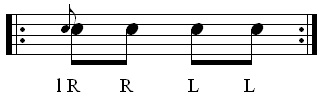
Here is a fairly simple exercise which uses a flam to increase the notes on the weaker hand by one. The great thing about using a flam like this is that not only does the left hand have to play an extra note, but that note has to be even quicker than the others — remember that grace notes always come BEFORE the beat. This will really help develop the finger control on your left hand and also the skill of allowing the grace note to be purely passive — that is, letting the last note of the exercise simply drop and rebound to produce the grace note.
Tip 5 — General weak-hand skill exercise
Here is a great exercise for working on weak hand control. I have actually included two versions of the exercise here, and although the difference in the notes is very small indeed — simply one of rhythm — the technical difficulties involved change dramatically. The first version is shown here immediately below written for a right hander as usual, so lefties swap it around.
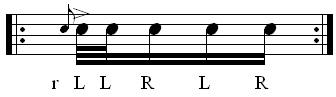
The right hand is doing very little work in this exercise because all the notes are small and slow. The fast double left is really the factor which limits the speed here — and it does limit it quite a bit — so the right hand has it easy. The left hand however has to play the fast double. Not only that, but it has an accent. This is the real skill we are working on here.
We need to isolate the motion of the accent from the other notes to prevent them getting louder as we speed the exercise up. Because we have a single LH small note in there as well which requires a controlled wrist position, we cannot use the wrist to power the accent at all. The accent must come completely from the arm — bending at the elbow — and the following note must be a passive rebound controlled with the fingers holding the stick butt close to the palm. Think of the LH as performing two strokes — the single-accent double stroke, and the single “tap”.
A variation of this exercise is shown below. Only the rhythm is changed, so all the notes are the same length. This means that there is less limitation on the overall potential speed of the pattern.
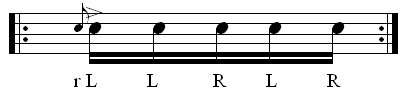
Because of this the primary difficulty is no longer in isolating the accent from the following note. Instead it simply becomes an issue of getting the left hand up high enough for the accent soon enough. The double stroke is slower so there is plenty of time to use controlled rebound for the note following the accent using the wrist or fingers or both. Because the pattern is faster overall though, there is much less time to lift the arm in preparation for the accent.
So with this variation the emphasis is more on the upwards part of the arm motion, rather than on the fingers controlling the rebound of the arm motion.
As usual — the blatant self promotion: check out the “Stick Technique” book at www.sticktechnique.com for heaps of info on drumming technique.