Drumming · Technique · Rudiments · Gear · Lessons & Learning
5 Drumming Technique Tips
5 tips for building up the weaker hand — week 03
Tip 1 — Tip for traditional grip users
This week’s “traditional grip” tip is not so much about building up your ability, as it is about getting a better result. Have you ever noticed that many traditional grip users tend to have the snare drum angled so it is significantly higher on their left side? Have you ever wondered why?
Well of course the angle of a rope-hung marching drum is the reason why the traditional grip was developed in the first place, but even without the forced angle, there is a good reason why many drummers continue to adjust their drums this way. Now let me be clear that I don’t recommend excessive angles on the snare drum in any scenario — especially not those angles towards the performer — but a little angle away from the left hand can improve the efficiency of the traditional grip.
The reason is simply that it means the bicep is not at full flex to achieve 90 degrees of stick rotation from the drum head using the forearm rotation alone. This forearm rotation is the primary movement vehicle for the traditional grip so it is an important one. You can always swing the elbow more in front of the body with each stroke to achieve a few extra degrees of upwards rotation, but this takes way more effort.
With the elbow in the normal position, 90 degrees is the absolute maximum rotation the forearm can achieve, resulting in the palm facing straight up. There is 180 degrees of rotation available though, right through to the palm-down position. Most of that is wasted though because the stick has to go past horizontal to get there and the drum stops it. So rather than use the maximum bicep tension to achieve “palm up” — a little angle on the drum lets you have a little more of the 90 degrees of rotation happening further down in the middle part of the muscle’s full range.
Tip 2 — Tip not involving drumming
You are probably sitting at a computer right now reading this… Try moving the mouse to the other side of the keyboard and using the other hand to do all the mousing! I guarantee you that your productivity on the computer will go way down but you may just gain a little valuable co-ordination with the weaker hand. I’m still not great with my left hand mousing, but I’m getting better!
Tip 3 — Tip for evenness and matching the hands
This week’s tip in this area is not so much about improving the weak hand, but more about taking imperfect sticks and using them to our advantage to compensate for a weaker hand. Many of us take great pains to buy drum sticks in matched pairs — pairs that supposedly have identical balances etc. Some drummers never even bother or consider it.
Well drum sticks very rarely in fact come from the factory well matched and there is no doubt that badly matched drumsticks can result in badly matched drumming technique! Quite often drumsticks will claim to be matched, but it seems this is in the area of balance only. It’s quite common to find a pair of “matched” sticks that feel identical, but sound quite different. This is because the sound we get from striking a drum actually comes partially from the vibrating stick. It’s true that this sound is most audible when using a practise pad but some snare drummers will notice this with the snare drum as well.
When buying sticks listen carefully to the sound of a normal medium stroke under rebound, then put the other stick IN THE SAME HAND and compare the sound. Using the same hand ensures there is minimal difference caused by our own inconsistency.
Even when sticks are identical in sound at the moment of purchase, they don’t always stay that way. As they age sticks may vary their moisture content at different rates and end up sounding different over time. For this reason I often buy a few pairs of identical sticks at a time. I go through the whole pile of a certain type of stick testing each one, and try to find 6 to 10 identical ones. This improves my chances of having matched pairs further down the track.
Tip 4 — Playing more notes with the weak hand, or leading with the weak hand
Here’s one for all the drum kit players out there. Find a page of reasonably easy rock beats in your favorite book of rock beats (or wherever else you might find them). Try to find some which use straight eighths (quavers) on the high-hat. This shouldn’t be difficult as this style of rock beat is the most common. Most of us learn to play these beats with the strong hand crossing over the top of the weak one to reach the high-hat. Try swapping hands! Not only will this force you to change your co-ordination and the emphasis of the notes, but — let’s face it — with most simple beats there are way more high-hat notes than snare drum notes, so your weak hand will be working more for once!
Tip 5 — General weak-hand skill exercise
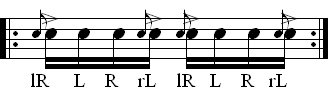
This week’s tip in this area is another rudiment — the pataflafla. Like many rudiments, whilst it is even in terms of how many accents and how many notes each hand has to perform, the order of these notes means that the physical motions required are not necessarily even at all.
Whichever hand plays the first accent of the pataflafla (the leading hand) has a much tougher job of things. The most difficult physical part of performing this rudiment quickly is like many others — the upwards lift of the arm before the accents. For the non-leading hand there is plenty of time — there is a whole other note between its soft note and its accent. For the leading hand there is no gap at all — we have to go directly from playing the grace note (the little one of the flam) to the accent which, being on the beat, is likely to be perhaps even a little greater than the other!
The pataflafla is shown below the way most of us always perform it — leading with the right hand. This week, reverse the sticking pattern below, and work on it leading with the left hand.
As usual — the blatant self promotion: check out the “Stick Technique” book at www.sticktechnique.com for heaps of info on drumming technique.